
How to Screen Record on Your iPhone
Ever found yourself wanting to share a quick tutorial, showcase a high score in a game, or simply capture a funny moment on your iPhone? Well, good news! Your iPhone comes with a built-in feature that lets you screen record with just a few taps. In this guide, we’ll walk you through the steps of how to screen record on your iPhone, so you can share those memorable moments with friends or save useful information for later.

Step 1: Open Control Center

Let’s start by accessing the Control Center. Depending on your iPhone model:
– On iPhone X and newer models, slide your finger down from the top-right corner of the screen.
– For iPhone 8 and earlier: Swipe up from the bottom edge of the screen.
Step 2: Locate the Screen Recording Icon
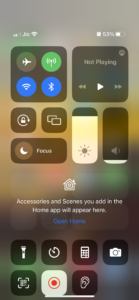
Look for the magic button — the Screen Recording icon. It’s a small circle inside another circle and is usually located among the Control Center icons.
Step 3: Customize Your Recording (Optional)
Want to add a personal touch? Press and hold the Screen Recording icon until additional options appear. Here, you can enable or disable the microphone for audio recording. Handy if you want to add your voice or capture the sounds around you.
Step 4: Start Recording
Ready to roll? Tap the Screen Recording icon, and you’ll see a 3-second countdown. During this time, navigate to the app or screen you want to record.
Step 5: Record Your Screen
Once the countdown reaches zero, your iPhone will start capturing everything on your screen. You’ll see a red bar at the top, indicating that the recording is underway.
Step 6: Stop Recording
When you’ve captured your masterpiece, it’s time to stop the recording. Open the Control Center again, tap the red recording icon, or tap the red status bar at the top of your screen. Choose “Stop Recording” from the prompt.
Step 7: Access Your Recording
Wondering where your creation went? Fear not! Your screen recording is automatically saved to the Photos app on your iPhone. Head to the “Recents” or “All Photos” album to find your masterpiece.
A Few Reminders:
– Screen recording captures everything on your screen, including notifications.
– If you enabled microphone recording, your iPhone will also capture ambient audio or your voice during the recording.
– Check your storage space to ensure you have enough room for your recordings.
And that’s it! You’re now equipped with the knowledge to capture and share your iPhone screen with the world. Whether it’s for fun or educational purposes, screen recording is a nifty feature that adds a new dimension to your iPhone experience. Happy recording!
Read More:How to Change Your Apple Watch Band:A Quick and Easy Guide